How do I add a printer on a personally-owned Windows computer?
Step 1 of these instructions is for personally-owned Windows computers when using wireless network, must be SMUMN-Secure or using the wired connections in ResHall spaces.
If connecting to the wired SMUMN network in public spaces, not reshalls, such as Library, Hendrickson computer labs, Science and Learning Center start with Step 2.
STEP 1. If this is your first time, click here to download the SMUMN Printing and Network Folder login application and follow the onscreen instructions.
*Note: You will periodically have to re-log in through this icon to print in the future.
![]()
STEP 2. In your Start menu search box type in Add a printer
2a. Click "Add a Printer" from the list
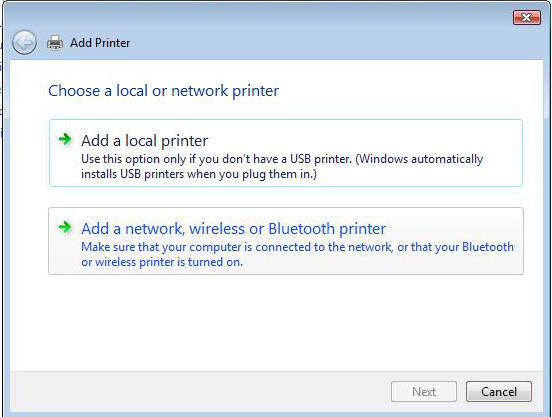
STEP 3. Chose add a network, wireless or Bluetooth printer.
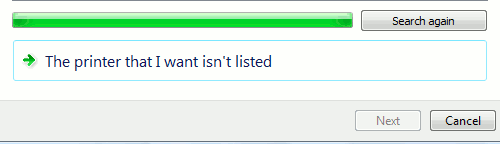
STEP 4. Chose The printer that I want isn't listed, and press next.
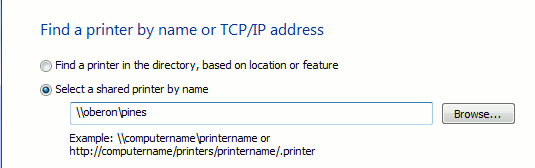
STEP 5. Select a shared printer by name. Enter \\oberon\(reshall printer name her). See list below for ResHall printer names.
Step 5a. Click Next.
|
Printer Names: |
|
| Benilde1, Benilde2 | Eds1, Eds2 |
| Gilmore | Heffron2, Heffron3, Heffron4 |
| Hillside | Joes |
| LaSalle | Pines |
|
Skemp1, Skemp2, Skemp3 |
Leo1, Leo3 |
| Yons | SLC Lower Hub not a ResHall |
STEP 6. Press Install driver, then next and finish.
STEP 7. The printer should now be added. To print later you must repeat step 1. This is required if you logoff, laptop goes into sleep mode or after a restart or shutdown/power on.
Please note: this is the same process if you are going to use another SMUMN printer, such as in the Library, Toner pod, or Hendrickson Center Lower level (HCStudAccess) over the wireless network.